My Rig
Here is it guys, my audio arsenal. Well, part of it anyway.. This is the location rig I took with me across Nepal and India for 6 weeks. With the gear inside this conveniently sized backpack I can make direct to stereo recordings using the Mid-Side (or M/S) microphone technique. So, lets dive in…
Basically, it’s all housed in a Kata 3n1-33 backpack, which is actually made for photographers but works amazingly well carrying audio gear too!
I also have the extra tripod holder attached which securely carrys my Manfrotto 5001B Nano stand.
The Manfrotto stand is extremely compact and lightweight without sacrificing sturdiness, and the thread at the top attaches directly to the pistol grip of my mics. It can’t extend to a great height, but it’ll save your arm from dropping off after holding a mic in the air for half an hour..
On the right you can see the bag from above. The top section zips all the way open for a good bit of carrying space. Here it’s holding all my adaptors and chargers for the rig.
Whilst travelling Nepal and India it was a great space for throwing my jacket when it got too hot, or storing a sneaky roll of toilet paper. Always an essential item.
Now this is where the Kata bag gets its “33” from. There is actually a 3n1-30 version that doesn’t include this laptop pocket but I went for the 33 to give me an extra bit of storage space. It works great for carrying clipboards and books too.
If you were to throw a laptop in it you can rest assured it wouldn’t get damaged with all the extra padding around the pocket.
On each side of the backpack is a small zip up pocket with a mesh pocket inside. There isn’t a whole lot of room in these but enough to carry a few spare batteries and headphone adaptors.
You can see the brush for my windjammer in there on the left.
Now we’re getting into the main section of the bag. This is the side pannel which zips all the way open for easy access when using the bag as a sling.
From here I can easily wack on my heaphones (Audio Technica ATH-M50), pull out the mics, and switch on the recorder. All ready to go in a matter of seconds!
This is the main section from the front. I’ve removed my headphones, mic, and windjammer so you can see just how much space is in here.
To the right of the recorder is my custom made Mogami/Neutrik stereo cable. And on the far right you can see a small yellow pouch that comes with the bag. I use this to store spare memory cards.
Also, the bottom of the bag is lined with velcro strips that can come in very handy (you’ll see why below!).
Here is my location recorder, the awesome Sound Devices 702. This bad boy is very solid and compact, great for using on location and amazing to travel with.
One of its best features is the use of Sony video camera batteries, which are a bit of a standard in the film world. Handy if you’re on set and forget a charger, or a battery dies unexpectedly.
And here is where the velcro strips inside the backpack come in handy. I’ve stuck two heavyduty velcro strips on the bottom of the 702. These of course attach to the strips inside the bag to hold the 702 securely in place.
They’re so strong I can actually lift the whole bag up by the 702 when it’s attached!
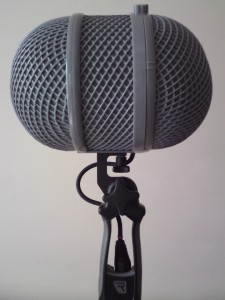
Now we’re getting into the microphones. On the left is my Rycote Windscreen with Pistol Grip. This houses the M/S pair.
The Pistol Grip can fold up for more compact storage and is very lightweight. It also houses the neutrik 5-pin stereo connector.
The back of the Windscreen screws off for access inside and can be completely removed as you will see below.
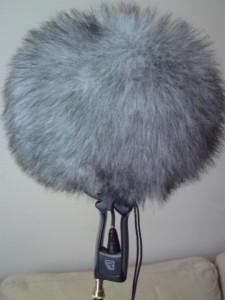
Here is the Rycote Windscreen with its Windjammer on. The Windjammer is a specially made cover to be used when outdoors in a windy environment. It can significantly lower wind noise that would otherwise ruin a great recording! Very handy indeed.
You can see to the right of the Pistol Grip, a black cord coming from the Windjammer. This is a pull cord that tightens the Windjammer around the Windscreen.
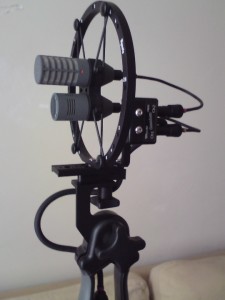
Removing the Windscreen we can now see the microphones inside. On top is a Schoeps CCM8 figure 8 and below it, a Schoeps CCM4 cardioid. Together these make up the M/S pair and are held in place by a Rycote shockmount.
Like the rest of the kit, the shockmount is a sturdy piece of gear. Definitely what you’re after for holding such delicate microphones.
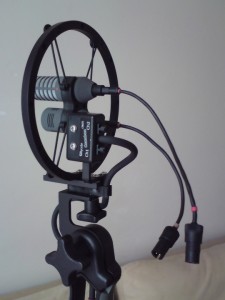
On the right is the Rycote Conbox (black box with the two silver screws). This accepts the two mic inputs from the microphones and outputs to a single stereo cable which feeds down through the pistol grip and terminates in the 5-pin connector.
One great thing about this particular Conbox (there are many different models) are the detachable cables. Having such a modular design is great. If something fails or breaks you can just replace that part, rather than having to buy a whole new kit!
You can also see the rear of the mics here, where the cables are detachable too.
And there you have it people! This rig really is amazing for making direct to stereo recordings, I can’t recomend it highly enough. All of the recordings I made in Nepal and India that you will hear on this site were done with this simple set up. No further mixing or processing has been done to any of them!
If you have any questions or would like to know more about any peice of the gear just leave a comment below!


